
PILLAR 2: TECHNICAL GEAR & INDUSTRY LAB
The complete masterclass on paddle customization, swing weight vs. twist weight physics, clock positions, and pro-level weighting setups.
Welcome to the definitive pickleball lead tape guide, an essential companion to our master pickleball paddle guide. Whether you want to stabilize a 13mm vs 16mm pickleball paddle that flutters on off-center hits or add putaway power to a control frame, weighted tape is the secret tuning tool used by top competitors.
Most amateur players assume that the paddle they pull out of the retail box is locked into its factory specifications forever. In reality, manufacturers design mass-market paddles to fit the middle 50% of consumers, often leaving them headlight, light on overall mass, and prone to torsional twisting. By strategically applying adhesive lead or tungsten tape along the perimeter edge guard, you can alter the physical balance point, expand the active sweet spot, and boost your plow-through without spending $250 on a new paddle.
Under official regulations sanctioned by USA Pickleball in Rule 2.E.5b and verified by the USA Pickleball Equipment Certification Lab, adding perimeter weighting to your paddle edge guard is 100% legal for tournament competition. However, placing tape haphazardly can inadvertently slow down your kitchen hand speed, create erratic dead spots, or strain your forearm muscles.
This masterclass pickleball lead tape guide walks you through the physics of static weight, swing weight, and twist weight. You will learn the exact clock-face placements, gram-by-gram formulas for specific player archetypes, and a foolproof installation protocol to dial in your gear with scientific precision.
⚡ The 30-Second Pickleball Lead Tape Placement Cheat Sheet
Short on time? Here is the quick-reference breakdown of where to place weight on your paddle edge guard and the direct mechanical outcome on court:
| Clock Position | Paddle Region | Swing Weight (SW) | Twist Weight (TW) | Primary Performance Benefit |
|---|---|---|---|---|
| 12:00 | Top Edge / Tip | +6 to +10 pts (Max) | Minimal change | Explosive drive pace, serve depth & heavy putaways. |
| 10:00 & 2:00 | Upper Shoulders | +3 to +5 pts (Moderate) | +0.3 to +0.5 pts (Good) | The gold-standard all-court blend of power and perimeter stability. |
| 3:00 & 9:00 | Perimeter Sides | +1 to +2 pts (Low) | +0.6 to +0.9 pts (Max) | Massive sweet spot expansion; neutralizes paddle twist on off-center resets. |
| 4:00 & 8:00 | Throat / Neck | 0 to +1 pt (Near Zero) | +0.2 to +0.4 pts (Low) | Absorbs ball shock & adds solid mass without sacrificing kitchen hands. |
1. The Physics of Paddle Tuning: Why Every Pickleball Lead Tape Guide Starts with Weight Physics
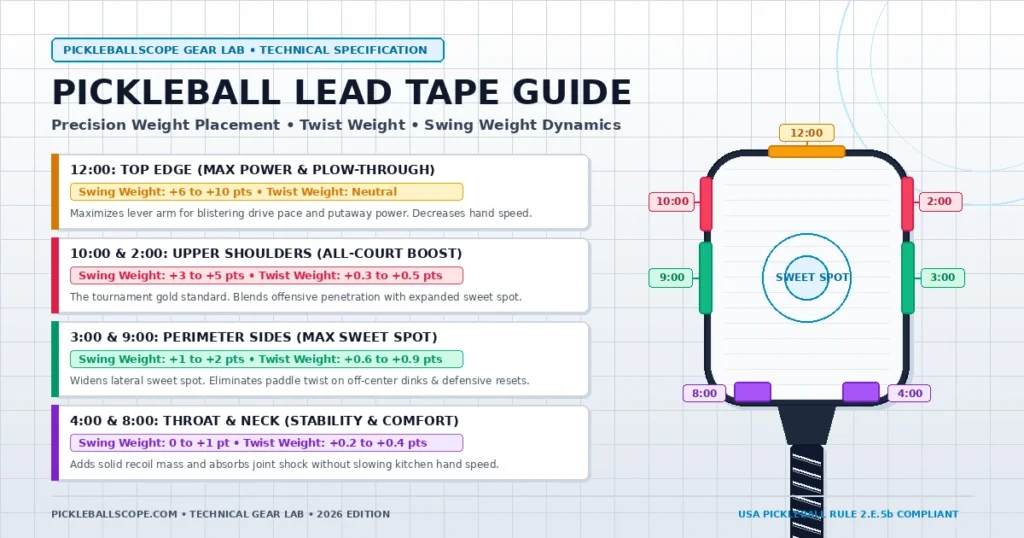
Before sticking your first piece of tape onto an edge guard in this pickleball lead tape guide, you must understand the three distinct physical metrics that govern paddle mechanics: static weight, swing weight, and twist weight.
Static Weight: This is simply the total weight of the paddle resting motionless on a digital scale, measured in ounces or grams. Most modern paddles ship between 7.5 and 8.3 ounces. While static weight gives you an idea of overall paddle heft, it tells you almost nothing about how heavy the paddle actually feels when you swing it through the air.
Swing Weight (Dynamic Inertia): Swing weight measures the paddle rotational resistance during forward swing acceleration, rotating around a pivot point 4 inches up from the butt cap. Two paddles with an identical static weight of 8.0 ounces can feel radically different: a paddle with weight concentrated in the tip feels like a heavy sledgehammer, while a paddle with weight concentrated in the handle feels featherweight. Higher swing weight produces deeper drives and heavier ball plow-through, but requires more forearm strength and reduces reflex hand speed.
Twist Weight (Torsional Stability): Twist weight measures the paddle resistance to twisting along its central vertical axis when the ball strikes off-center. When you catch a 50-mph drive near the paddle outer edge, low twist weight causes the paddle face to twist open in your grip, spraying the ball into the net or pop-up kill zone. Higher twist weight stabilizes the perimeter, expanding the active sweet spot and giving you rock-solid stability during defensive blocks.
2. The 4 Essential Clock Positions: Where to Put Lead Tape on Your Pickleball Paddle
Position 1: The 12 O’clock Spot (Top Edge / Head)
Applying tape at the 12 o’clock position places mass at the absolute maximum distance from your wrist pivot. This creates the highest possible leverage and exponentially raises your swing weight with minimal added mass. A mere 2 to 3 grams of tape at 12:00 can raise swing weight by 6 to 9 points.
This placement is engineered for aggressive singles competitors, tennis converts who love crushing baseline drives, and players who struggle to generate natural putaway velocity. The downside is an immediate hit to hand speed at the non-volley zone line—if you engage in rapid kitchen fire-fights, a 12:00 setup can feel sluggish.
Position 2: The 10 & 2 O’clock Spots (Upper Shoulders)
The 10 and 2 o’clock configuration is widely recognized as the single most versatile setup in tournament pickleball. By distributing weight along the upper corners of the paddle face, you capture roughly 70% of the drive power and plow-through of the 12:00 spot, while simultaneously boosting lateral twist weight.
This position raises your sweet spot slightly higher toward the upper half of the paddle face, which is where advanced players naturally contact the ball on speed-ups and roll volleys. It provides a noticeable boost in drive penetration without turning your paddle into an unmanageable club.
Position 3: The 3 & 9 O’clock Spots (Perimeter Sides)
If your primary goal is maximizing forgiveness, touch, and reset consistency, the 3 and 9 o’clock placement is unmatched. Placing tape directly along the horizontal equator of the paddle face maximizes the perpendicular distance from the central axis, driving twist weight to its theoretical ceiling.
Because this weight sits near the middle of the paddle length, it keeps swing weight increases down to just 1 or 2 points. Your hand speed remains lightning-fast at the pickleball kitchen rules line, giving your pickleball dinking strategy maximum stability on perimeter mishits.
Position 4: The 4 & 8 O’clock Spots (Throat & Neck)
Applying tape along the paddle throat—just above where the face tapers into the handle—is the ideal method for increasing total paddle mass without altering swing dynamics. Because this mass sits directly adjacent to your hand, the swing weight delta is virtually zero.
Throat weighting provides crucial structural dampening. The extra mass absorbs harsh ball impact shock, dissipating vibrations before they reach your elbow tendons. When paired with a dedicated pickleball warmup routine, it is an exceptional setup for players rehabilitating tennis elbow.
3. Lead Tape vs. Tungsten Tape: Which Material Should You Choose?
A vital question we address in this pickleball lead tape guide is material selection: while traditionalists refer to all weighting as “lead tape,” modern pickleball offers two distinct material choices: traditional adhesive lead tape and non-toxic tungsten silicone tape.
| Feature / Metric | Adhesive Lead Tape | High-Density Tungsten Tape |
|---|---|---|
| Material Composition | Pure rolled lead foil with adhesive backing | Tungsten powder embedded in flexible silicone/rubber |
| Linear Density | 0.5g/inch (1/4″ wide) or 1.0g/inch (1/2″ wide) | 1.0g to 2.0g per strip (Pre-cut weights) |
| Toxicity & Handling | Toxic if ingested; requires hand washing or cover tape | 100% Non-toxic and safe to handle bare-handed |
| Application Flexibility | Customizable with scissors to exact millimeter lengths | Fixed pre-cut strips; harder to trim cleanly |
| Cost | Inexpensive ($8–$12 for a 100-inch roll) | Moderate to high ($15–$25 for a small pack) |
| Aesthetic Finish | Metallic silver (Looks best under electrical tape) | Matte black (Blends seamlessly with edge guards) |
For most competitive players, standard 1/4-inch high-density lead tape covered with clean black electrical tape remains the industry standard because it allows you to customize weight increments down to a tenth of a gram. However, if you have young children in your household or prefer pre-cut matte black aesthetics, tungsten tape is an outstanding, worry-free alternative.
4. Step-by-Step Installation Tutorial: Our Proven Pickleball Lead Tape Guide Setup Protocol
Applying weight to your paddle in this pickleball lead tape guide requires ten minutes and basic household tools. Follow this step-by-step tutorial to ensure permanent adhesion and balanced performance:
Tools Required:
- 1 roll of 1/4-inch or 1/2-inch adhesive lead tape (or pre-weighed tungsten strips)
- Digital jewelry scale with 0.1-gram accuracy
- 70% or 91% Isopropyl rubbing alcohol and microfiber cloth
- Sharp scissors or utility razor
- Roll of 3/4-inch standard black PVC electrical tape
Step 1: Record Your Baseline Factory Specs
Place your completely clean, unmodified paddle onto the digital scale and record its base static weight in grams (and ounces). If you use an overgrip or edge guard tape, leave them on so your baseline reflects your true playing weight.
Step 2: Clean and Degrease the Edge Guard
Pickleball edge guards accumulate sweat, court dust, sunscreen, and ball residue. Moisten a microfiber cloth with isopropyl alcohol and vigorously scrub the entire perimeter edge guard where tape will sit. Allow it to air dry for two minutes. Applying tape over oily dust guarantees it will peel off mid-match.
Step 3: Measure and Cut Symmetrical Strips
Never eyeball your tape lengths. Measure two identical strips using a ruler and weigh them together on your digital scale to verify that both sides of your paddle receive the exact same mass. Asymmetrical weighting causes unpredictable paddle twisting during strokes.
Step 4: Center and Press Firmly Along the Edge Guard
Peel the adhesive backing paper. Carefully center the strip along the outer spine of the edge guard, starting from your target clock position. Press firmly with your thumb, rubbing along the entire length to eliminate air bubbles and activate the pressure-sensitive adhesive.
Step 5: Cap with Protective Electrical Tape
Once your lead strips are installed symmetrically on both sides, wrap a continuous layer of black electrical tape over the entire top perimeter. The electrical tape shields the lead from contact with your hands, prevents peeling when digging low balls off gritty court surfaces, and creates a sleek, professional tournament appearance.
5. Player Archetype Prescriptions: Finding Your Ideal Setup
To help you pinpoint the best setup quickly, our pickleball lead tape guide provides four field-tested tournament prescriptions tailored to your playstyle:
Preset A: The Kitchen Wall
Target: Stop paddle flutter on off-center blocks, expand sweet spot width, and keep third-shot drops feather-soft.
- Placement: 3.0g at 3:00 + 3.0g at 9:00 (Total: 6.0g).
- Tape Length: Two 6-inch strips of 0.5g/in tape centered at equator.
- Court Feel: Massive sweet spot, zero flutter, lightning hand speed.
Preset B: The Power Cannon
Target: Boost groundstroke depth, drive velocity, overhead putaways, and serving pace.
- Placement: 2.0g at 10:00 + 2.0g at 2:00 + 1.5g at 12:00 (Total: 5.5g).
- Tape Length: Two 4-inch strips on shoulders, one 3-inch strip on head.
- Court Feel: Heavy plow-through, deep baseline drives, head-heavy feel.
Preset C: The All-Court Competitor
Target: Harmonious blend of offensive drive punch and kitchen reflex stability for competitive doubles play.
- Placement: 2.0g at 10 & 2:00 + 1.5g at 3 & 9:00 (Total: 7.0g).
- Tape Length: Four balanced strips across shoulders and sides.
- Court Feel: Crisp pop on speed-ups, forgiving sweet spot, fast hands.
Preset D: The Arm Relief Shield
Target: Eliminate harsh impact vibration and arm fatigue without sacrificing kitchen touch.
- Placement: 2.5g at 4 & 8:00 (throat) + 2.0g at 3 & 9:00 (Total: 6.5g).
- Counterbalance: Add 4g lead under grip wrap near butt cap.
- Court Feel: Solid, dampened, plush impact; shock trapped before forearm.
6. Common Lead Tape Mistakes That Ruin Your Game
Tuning your paddle is an exact science. Avoid these four common pitfalls that derail players when experimenting with weighted tape:
- Adding Too Much Weight at Once: Jumping from a 7.7-ounce stock paddle directly to 8.6 ounces shocks your rotator cuff and forearm muscles. Always add weight in modest 2-to-3 gram increments, playing at least three full matches before adding more.
- Ignoring Grip Counterbalancing: When you add substantial weight to the top or shoulders of your paddle, the balance point shifts dramatically toward the head. If the paddle feels clumsy in your hand, wrapping a secondary overgrip or adding 3 grams of tape to the handle restores a balanced, headlight feel.
- Asymmetrical Weight Distribution: If you place 4 grams of tape at 3 o’clock but only 3 grams at 9 o’clock, your paddle will experience uneven torque every time you swing, causing inconsistent ball flight and unwanted side spin.
- Sticking Tape on the Paddle Face: Applying lead tape directly inside the playable carbon hitting surface is strictly illegal under tournament rules. Weight must always reside on the perimeter edge guard.
7. Official Rules: Is Lead Tape Legal in Tournament Play? (USA Pickleball Rule 2.E.5b)
Many intermediate players consult our gear lab asking whether perimeter weighting violates official tournament rules. According to official equipment rules governed by USA Pickleball, perimeter paddle customization is completely sanctioned under Rule 2.E.5b.
The rule specifically states that lead tape and edge guard tape are permitted aftermarket additions, provided they do not alter the paddle hitting surface or exceed maximum dimensional limits. You can apply lead tape along the edge guard, around the neck and throat, or underneath the handle grip wrap.
However, players competing in sanctioned tournaments governed by DUPR or USA Pickleball must ensure that tape does not cover manufacturers’ certification seals, and that no tape is affixed directly onto the textured hitting face where ball contact occurs.
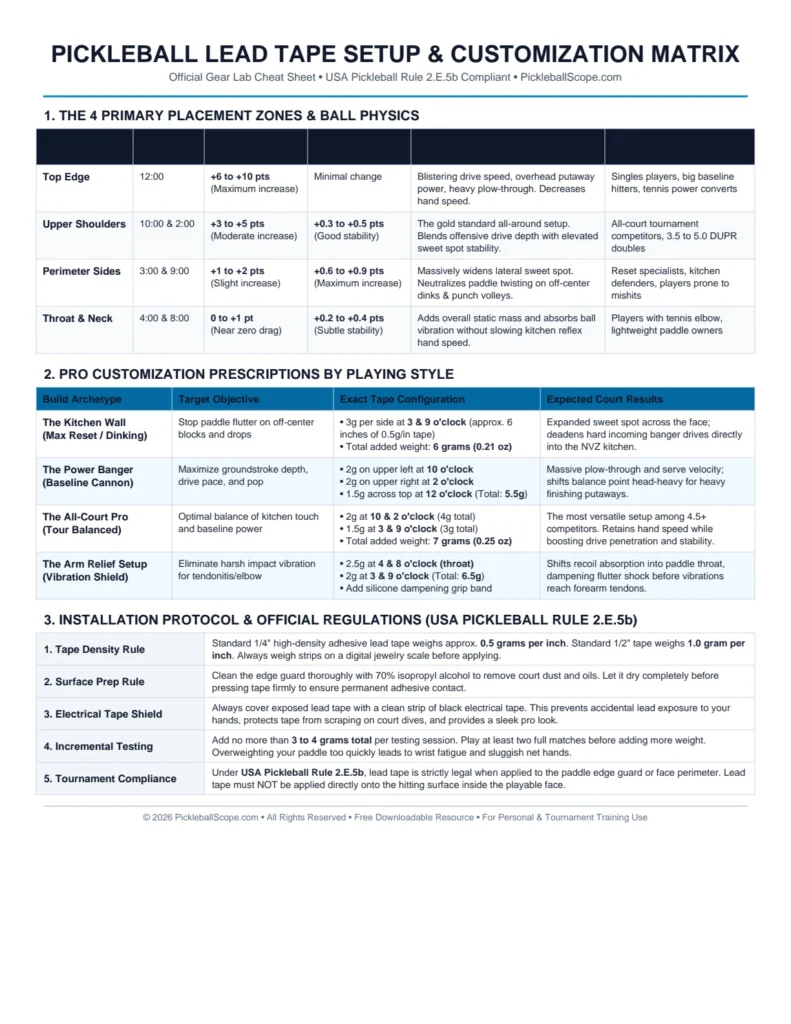
📄 Download the Free Lead Tape Placement & Setup Matrix (PDF)
Take the guesswork out of customizing your paddle. This 1-page printable reference card details exact gram-by-gram tape setups, clock positions, twist weight benchmarks, and player prescriptions for your gear bag.
Frequently Asked Questions: Official Pickleball Lead Tape Guide Breakdown
How much lead tape should I start with on my paddle?
Begin with 3 to 4 grams total (approx. 0.10 to 0.14 ounces). A safe starting point is placing 1.5 to 2.0 grams at the 3 and 9 o’clock positions to expand your sweet spot without altering your swing mechanics.
Will adding lead tape slow down my hand speed at the kitchen line?
Weight added at the 3 and 9 o’clock positions or at the throat (4 and 8 o’clock) has virtually zero impact on kitchen hand speed because it does not significantly increase swing weight. Only weight placed at 12 o’clock or the upper shoulders creates noticeable drag during rapid hand battles.
Is lead tape dangerous to touch?
Lead is toxic if ingested or absorbed through open cuts. However, handling lead tape during installation is safe if you wash your hands afterward. To eliminate all exposure risks, always cover your lead tape with a clean strip of black PVC electrical tape.
Can lead tape help relieve tennis elbow?
Yes. Increasing total paddle mass by placing tape at the throat and 3 and 9 o’clock positions provides extra inertia to absorb the shock of hard-struck balls. The paddle absorbs the energy, preventing harsh vibrations from traveling up into your forearm tendons.
Should I choose 1/4-inch or 1/2-inch lead tape?
1/4-inch tape is the universal standard for pickleball because it fits cleanly onto slim edge guards without spilling over onto the paddle face. 1/2-inch tape is thicker and heavier, but typically requires wide edge guards or cutting along its length to avoid face overlap.
Key Takeaways from This Pickleball Lead Tape Guide
- Customize for your weaknesses: Add weight at 12:00 for offensive drive depth, or at 3 and 9:00 for sweet spot stability and defensive resets.
- Start conservative: Add no more than 3 to 4 grams during your initial testing session and play multiple games before adjusting.
- Symmetry is essential: Always measure and weigh strips equally to ensure uniform torsional balance across both edges.
- Cover for protection: Seal exposed lead tape with standard black electrical tape for safety, durability, and a clean professional finish.
- Completely tournament legal: Perimeter weighting complies fully with USA Pickleball Rule 2.E.5b as long as the hitting surface remains unobstructed.
Displaying Pickleball Lead Tape Guide (WordPress Gutenberg Blocks).txt.